


Introducing Events: A WordPress Event Booking System Built Into LatePoint
For years, we’ve heard the same question from LatePoint users
“Can I use LatePoint to book an event?”
It’s come up in our feedback board, our support inbox, and our reviews. And we always knew there was a good reason people were asking.
LatePoint has always been about appointments.
The yoga instructor booking one-on-one sessions. The salon trying to keep every chair booked all day. The consultant keeping a calendar full of client calls.
Over time, we stretched that model further. Recurring Appointments made it easy to book the same slot every week. Group Bookings made it possible for several people to share one slot with the same instructor.
But both still follow the same basic model: a service, tied to a provider, booked into a time slot.
That’s exactly what you want when you’re running appointments.
But what happens when you’re not?
A one-time seasonal workshop. A weekend seminar that isn’t tied to anyone’s personal calendar. A photography class. A networking meetup. A ticketed event you’re running just once.
Trying to fit those into an appointment system has never felt quite right. It usually meant signing up for a completely separate ticketing tool – its own login, its own payment processor, its own way of doing things.
So we built Events.
Now you don’t have to choose between “the booking system I already know” and “the event tool that actually fits what I’m running.” Events is built for workshops, classes, seminars, meetups, and other gatherings that need registration. And it lives right inside LatePoint.
Instead of thinking about providers and appointment slots, you can simply create an event with the things that actually matter:
A name. A date. A capacity. A price.
Publish it, share it with your audience, and let people register directly from your WordPress site.
And because Events is built into LatePoint, registrations use the same orders, payments, customers, and checkout system you already have.
No separate event plugin to manage. No separate payment system. No second dashboard to check every morning.
Just create your event, publish it, and start taking registrations.
This is one of the biggest updates we’ve shipped for LatePoint yet – and it’s the one most of you asked for. Here’s what’s new.
What’s New at a Glance
Events brings a full registration workflow into LatePoint, and none of it requires adding another tool to your business:
- A new Events section, right next to Services, Agents, and Locations. If you can find your way around LatePoint today, you already know where to look.
- One event editor for the details, image, schedule, capacity, and pricing. No jumping across five screens to get one event live.
- Two shortcodes for the front end: an events list to show everything you’ve published, and a single-event button when you just want a direct “Register” link somewhere specific.
- A registration flow your customers already know. It’s the same wizard they’d use to book an appointment, so there’s nothing new for them to figure out.
- Order tracking for every registration, just like your appointment bookings.
- Notifications go out automatically when someone registers or cancels. You’re not writing a confirmation email by hand for every attendee.
- Multiple ticket types with LatePoint Pro, so you can offer options such as General Admission and VIP at different prices.
- QR code check-in, with LatePoint Pro. Scan and go – no printed list, no highlighter.
Let’s walk through how it actually works, starting with setting up your first event and then what your customers see when they register.
How Do You Set Up Your First Event?
A new home in your dashboard
Before you create your first event, head to Settings → General Settings → Events and turn on Enable Events Functionality. It’s a one-time toggle – flip it once and you’re set. If you skip it, LatePoint will point you back here the moment you try to access Events.
Once that’s on, you’ll find Events right in the sidebar, next to Services, Agents, and Locations – no new login, no separate interface to learn. Click into it and you’ll land on All Events, laid out the same way you already browse your services, with tabs for Categories, Registrations, and Tickets so everything stays in one place.

If you already know how to manage a service in LatePoint, you already know how to manage an event.
Building an event: four simple sections, one screen
The Add Event screen keeps everything organized from top to bottom, so you can set up an entire event without bouncing between tabs.
General
Add the basics:
- Event name
- Short summary
- Full description
- Status – Draft or Published
- Visibility
Media
Add a featured image for your event. It shows up on the event card wherever you’ve placed your events list shortcode, so one photo is all you need
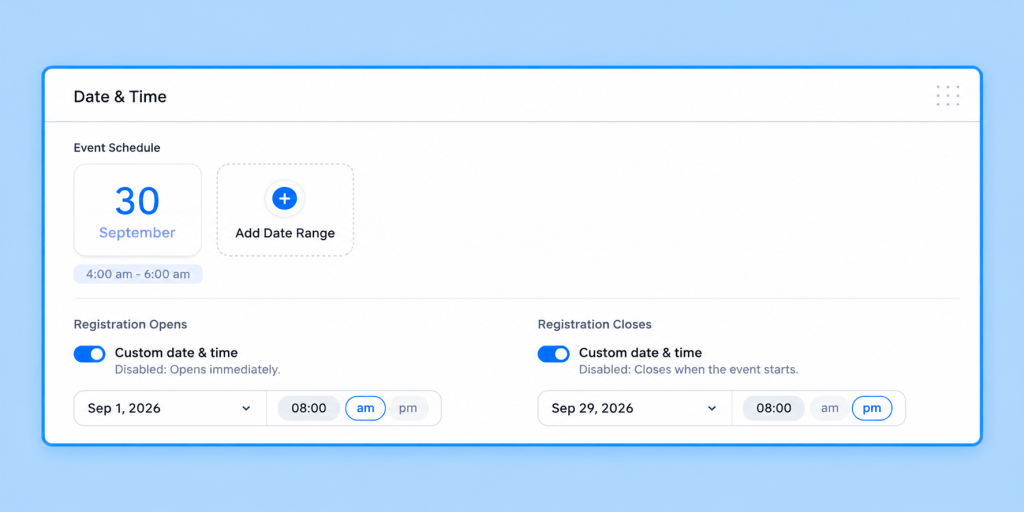
Date & Time
Events aren’t limited to a single date.
You can add multiple date ranges under one event, which is useful for things like a workshop that runs across three Saturdays.
You can also set custom registration open and registration close dates, so registration starts and ends exactly when you want it to.
Capacity & Pricing
Set the total capacity and decide how much it costs, and LatePoint enforces both for you automatically.
Free events are supported too – just set the price to 0.
You can also control whether the price is applied per ticket ordered.
Publish and you’re live
Once you’re happy with everything, hit Save Changes and your event appears on the All Events screen.
Each event card shows the date, capacity used, and price at a glance. No need to open it just to check how things are going.
Every Registration, Tracked Automatically – So You Don’t Have To
Once people start registering, you don’t need a separate spreadsheet or a guest list you’re updating by hand.
The Registrations tab gives you a live, always-current view of every registration across all your events.
You can see:
- Registration ID
- Confirmation code
- Event name
- Attendee name and email
- Ticket quantity
- Registration status
Filter by event, name, email, or status when you need to find someone fast.
And when it’s time to hand a list to a co-host, a venue, or a volunteer at the door, export everything to CSV with one click – no retyping names into a new file the night before.

Ticket Types and QR Check-In with LatePoint Pro
A single ticket price works for plenty of events. But sometimes your audience isn’t one-size-fits-all.
Maybe you have General Admission and VIP attendees. Maybe you want to reward early sign-ups with Early Bird pricing. Or maybe different ticket types should come with different levels of access.
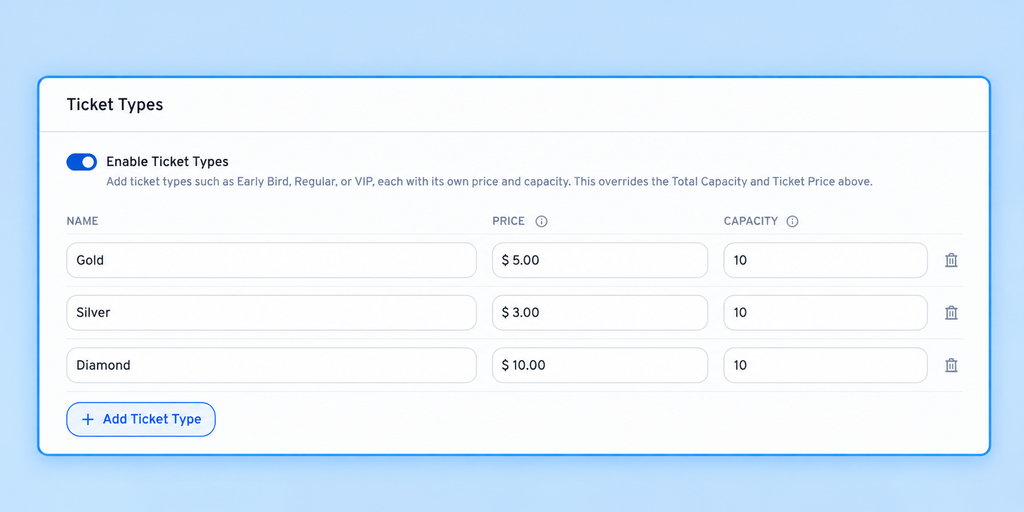
With LatePoint Pro, you can create multiple ticket types for the same event, each with its own name and price – so you get more revenue from the people willing to pay more, without building a separate product for each tier.
For example:
- Gold
- Silver
- Diamond
Customers choose their ticket type during registration, the same way they’d choose a service option when booking an appointment, nothing new for them to figure out.
Every ticket gets its own QR code – Just Scan and go
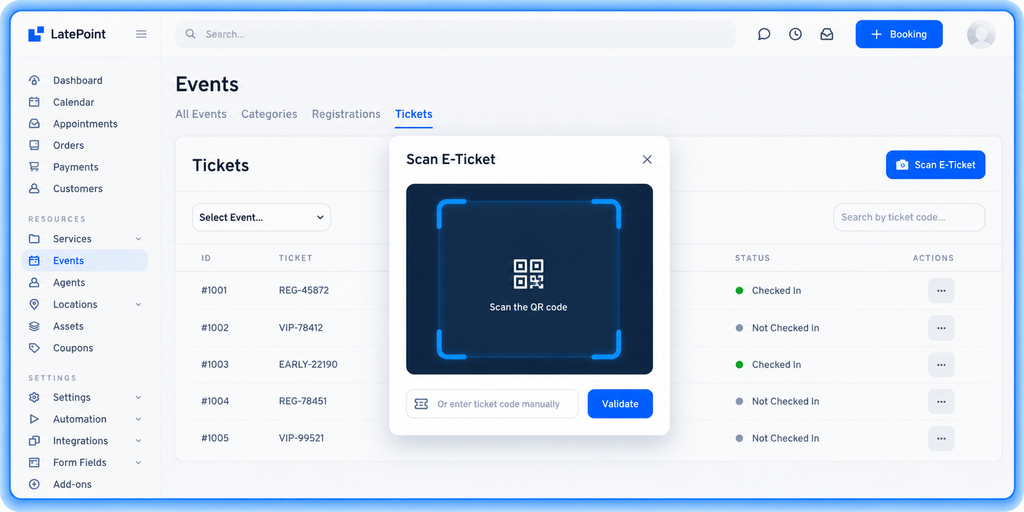
Each ticket issued through LatePoint Pro comes with a unique QR code, which means the door doesn’t need a separate check-in app, a laptop with a spreadsheet, or a printed list someone has to scroll through by hand.
When someone arrives:
- Open Scan e-Ticket in LatePoint.
- Scan the attendee’s QR code.
- If scanning isn’t possible, enter their confirmation code manually.
- LatePoint verifies the ticket and marks it as checked in.
That’s it. No guessing whether someone already checked in, no awkward pause while you scroll a list looking for a name.
For a larger event, a fast, reliable way to verify tickets at the door is the difference between a smooth start and a bottleneck at your own event.
What Your Customers Actually See
Setting up the event is only half the story. Here’s what makes someone actually complete a registration instead of closing the tab.
The Events List – a full events page without building one
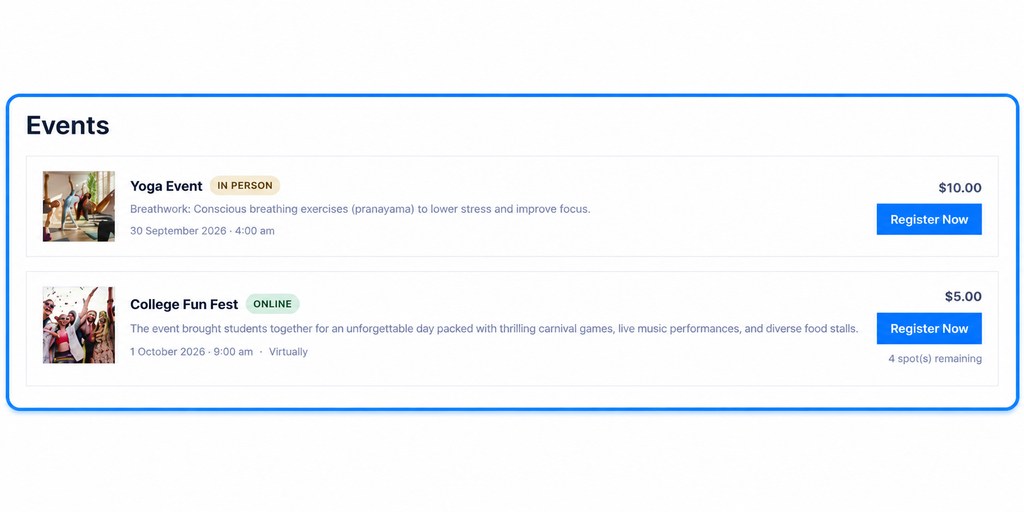
Add the [latepoint_events_list] shortcode to any page, and visitors see a responsive list of your published events – no custom template, no developer required.
Each event can show:
- Featured image
- Category
- Event title
- Short summary
- Date and time
- Location
- Price
- Register button
Control what appears with two optional attributes:
- category_id – Show events from a specific category by entering its numeric ID. Leave it blank or set it to 0 to show events from all categories.
- limit – Set the maximum number of events to display. The default is 20.
This gives you a real events or workshops page in minutes, not a multi-day build.
The Single Event Booking Button
Want a dedicated button pointing at just one event? Use:
[latepoint_event_button event_id=”X” caption=”Register 2″]
Swap X for your actual event ID and change the caption to whatever text you want on the button.
This is also useful if you don’t want to use our events list at all. Maybe you’d rather build your own custom landing page for the event, your own design, your own layout, exactly how you want it to look. You can still do that. Just drop this button wherever you need a registration link to live, whether that’s your custom landing page, an email, or a promo post. We’re not locking you into our layout; the button gives you the same registration flow with the freedom to build the page around it yourself.
Registering: The Same Flow Your Customers Already Trust
When a visitor clicks Register, LatePoint opens the same familiar booking wizard your customers already use for appointments – adapted for event registrations, so there’s no unfamiliar checkout to trip them up.
1. Event Information
The event date, time, and current availability are shown upfront, so there’s no confusion about what they’re signing up for.
2. Select Your Tickets
Customers choose how many tickets they want.
A running total shows the cost as they make their selection.
If you’re using LatePoint Pro and have multiple ticket types, they’ll choose their ticket type here as well.
3. Customer Information
Customers enter their contact details using the same form they’d use for an appointment booking. Returning customers move through it even faster, since LatePoint already knows who they are.
4. Verify Order Details
Customers get a final summary before completing the order, and can add other items or apply a coupon code where applicable, so there are no surprises after checkout.
5. Confirmation
Once the order is complete, they get their order number and their registration is done.
Why This Matters Under the Hood
The biggest advantage of Events isn’t just that you can publish an event. It’s that you never have to leave your existing setup to do it.
Every registration runs through the same orders and payments system that already handles your appointments – you’re not juggling two separate businesses under one roof.
When a registration is completed:
- It becomes a real order in your Orders list, just like an appointment booking.
- It appears under Events → Registrations, with the attendee and ticket details.
- The event’s remaining capacity updates automatically – no manual math, no risk of overselling.
- Everything stays inside the same LatePoint dashboard, customer records, and payment history.
So you can have a one-person consultation on Monday. A 40-person workshop on Saturday and both are managed from the exact same place, with the exact same reports.
You don’t need to build another system around your existing setup just because you’re running an event. That’s the part we’re most excited about.
Notifications That Work the Way You’d Expect
Events also plugs into LatePoint’s existing notification system, so you don’t have to configure a second set of emails from scratch.
Two new event-specific notification types are available:
Event Registration Created
Triggered when a registration is successfully created after an order is completed so attendees get confirmed automatically.
Event Registration Cancelled
Triggered when an event registration is cancelled so you and your attendee are both kept in the loop without a manual follow-up.
Both use the notification system you’re already familiar with, including merge tags such as:
{{customer_first_name}}
{{event_name}}
That means you can customize your event emails to match your voice, without learning another notification tool.
Who Is Events Actually Built For?
Events is for those times when what you’re selling is a place at an event, rather than a time on someone’s calendar and when the stakes of getting it wrong (no-shows, overbooking, a chaotic door) are higher than a single missed appointment.
For example:
Yoga & Fitness Studios
Run a one-time workshop, guest-instructor session, retreat, or special class outside your regular schedule.
Beauty Salons
Host a seasonal styling workshop, product launch, or beauty masterclass, and know exactly how many seats are left without checking three different places.
Consultants
Run a masterclass, seminar, training session, or group workshop, and collect payment and attendee details in the same place you already track client work.
Private Tutors
Offer a one-time exam-prep workshop or special group class outside your regular tutoring schedule, without opening a second booking tool just for it.
Photographers
Organize a group photo walk, photography workshop, or ticketed portrait day with limited spots and stop chasing payments over email.
Bike & Equipment Rental Businesses
Run a guided group ride, tour, or other experience with a fixed number of participants, with capacity limits enforced automatically so you never overbook a van or a trail group.
The rule of thumb is pretty simple:
If what you’re running is recurring and tied to a specific provider’s calendar, Recurring Appointments or Group Bookings are still the better fit.
If it’s a standalone event with a fixed date, capacity, and registration, Events is built for it.
Events Is Live
The Events feature is available now.
If you’re already using LatePoint, you can start creating your first event today with no new software to buy, install, or learn. And if you’ve been waiting for a simpler way to manage events alongside your appointments, this is it: one dashboard, one login, one system.
Create your event. Set your capacity and pricing. Publish it.
Then let LatePoint handle the registrations – so you can focus on the event itself.
Frequently Asked Questions
The core Events feature is included in the free LatePoint plugin – so you can start running events without paying anything extra. You can create and publish events, organize them into categories, set capacity and pricing, and accept registrations through your existing checkout. LatePoint Pro adds multiple ticket types per event and QR code check-in for when you’re ready to scale up.
Yes, with LatePoint Pro. Create ticket types such as General, VIP, Early Bird, or Regular, each with its own price so you can capture more revenue from attendees who want a premium experience, without extra setup work. Attendees choose their ticket type during registration.
LatePoint lets you publish an events list or event button anywhere on your WordPress site using shortcodes, so visitors can see event details, dates, pricing, and live availability before registering.It’s designed primarily for event registration and booking rather than as a traditional calendar-only plugin.
Yes, with LatePoint Pro. Every ticket gets a unique QR code the moment it’s issued, so there’s no printed list to manage and no separate app to buy. Scan the code using the Scan e-Ticket option in LatePoint, or enter the confirmation code manually if needed.
Events lives inside the same LatePoint plugin you already use for appointment bookings, so registrations, payments, orders, and customer records all stay in one place instead of being split across multiple systems and multiple bills. If you’re already using LatePoint for appointments, Events is simply another thing LatePoint can handle – not another plugin or subscription you need to manage.
Yes. An event can have multiple date ranges under a single listing, so something like a three-session workshop doesn’t require three separate listings, three separate pages, or three separate things for your attendees to keep track of.
Capacity updates automatically as registrations come in. The availability shown to visitors and the capacity tracked in your LatePoint admin both update in real time, so you’re protected from accidentally overselling an event and no manual tracking required.
Yes. The Event Registration Created and Event Registration Cancelled notifications are built into LatePoint’s existing notification system, so attendees are kept informed without any manual work from you.You can customize them just like your appointment notifications and use merge tags for details such as the attendee’s name and event name.