
- How to Display Tax-Inclusive Prices in LatePoint
- Bundled Services
- Managing Bookings With The New Shopping Cart
- Set custom start date for the calendar on your booking form
- How to make Phone Number a required field?
- How to Show Only Services or Only Bundles in a Booking Form
- How to Set Base Fee for Group Bookings
- How to Show Custom Display Price for Bundles
- Add booking form directly on a page
- Redirect to a custom “Thank you” page after booking is complete.
- Add custom content before or after booking steps
- Customize Book Button Appearance
- Add preselected Agent, Service or Location on Book Appointment Button or Form
- How to change time slot style on the calendar?
- Custom CSS for changing colors
- Booking Form Editor
- Specify which services, agents and locations will be available on a booking form
- How to pick specific categories to be displayed on the booking form
- How to show only services from specific category
- Set custom fonts for the booking form
- How to setup Facebook Pixel
- How to Disable the Messaging Functionality in LatePoint
- How to upgrade to Version 5?
- How to Update to Version 5.1.0
- Which addons are part of a PRO bundle in version 5?
- How to deactivate my license from a website I no longer use.
- Redirect to a custom “Thank you” page after booking is complete.
- How to add a link to terms of service checkbox custom field
- Edit content of the left panel section
- How to enable self hosted Google Calendar setup?
- How does LatePoint send emails?
- How to enable debug log?
- Add to Calendar link is not working
- Getting “One of the plugins is invalid” error when installing add-ons
- Error: unexpected ‘int’, expecting function…
- Service categories not showing during booking process
- Error: Cannot read properties of null (reading: verifyBuyer)
- WordPress Users still can’t login, even when “Use WordPress users as customers” option is checked
- New service is being created when trying to update existing service.
- Auto-sync of events from Google Calendar is not working
Event Notifications
Events integrate with LatePoint’s Workflows and Notifications functionality, allowing you to automatically notify customers when they register for an event or when their registration is cancelled.
Please check this doc first to learn more about LatePoint workflows: https://latepoint.com/docs/how-to-edit-content-of-notification-emails-and-sms/
Event Triggers
The following triggers are available when creating a Process or Notification:
- Event Registration Created
- Event Registration Cancelled
LatePoint includes default customer notification templates for both triggers, so registration confirmations and cancellation notifications work out of the box.
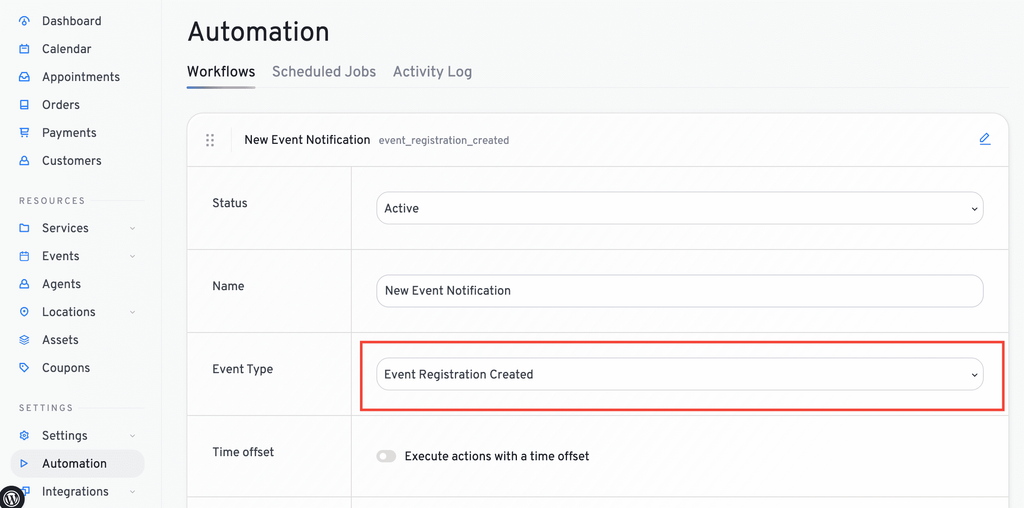
You can edit the default templates or create your own notifications.
Event Notification Variables
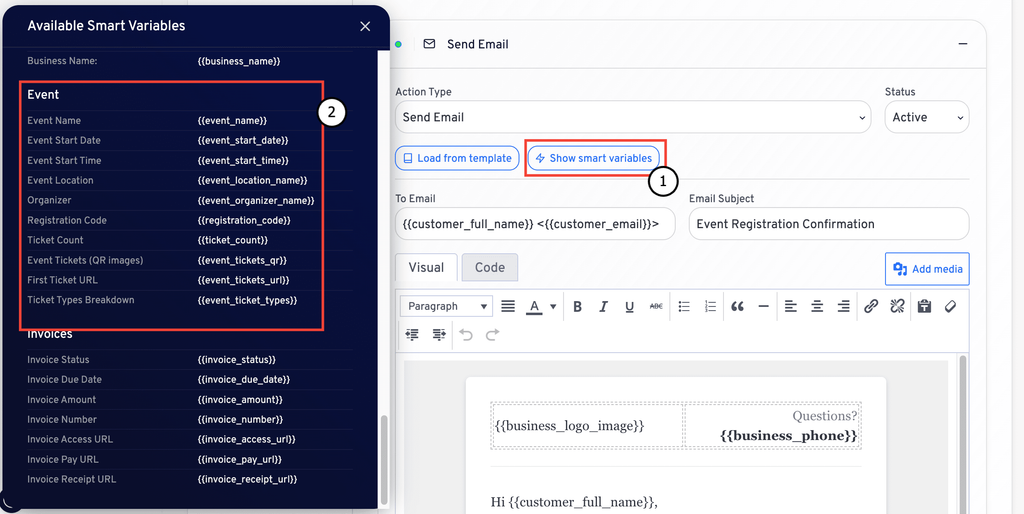
The following variables can be used in Event notification templates:
| Variable | Description |
|---|---|
{{event_name}} | Event name. |
{{event_start_date}} | Event start date. |
{{event_start_time}} | Event start time. |
{{event_location_name}} | Event location. |
{{event_organizer_name}} | Event organizer. |
{{registration_code}} | Event registration code. |
{{ticket_count}} | Number of tickets registered. |
{{event_ticket_types}} | Ticket type and quantity information. Available when Ticket Types are enabled. |
{{event_tickets_qr}} | QR codes for the event tickets. Available when E-Tickets are enabled. |
{{event_tickets_url}} | URL of the first event ticket. Available when E-Tickets are enabled. |
Ticket Type Information
{{event_ticket_types}} displays the ticket type, quantity, and total for each ticket type.
For example:
Adult × 2 — $60.00, Child × 1 — $15.00
Event Ticket QR Codes
{{event_tickets_qr}} inserts a QR code block for each ticket in the registration.
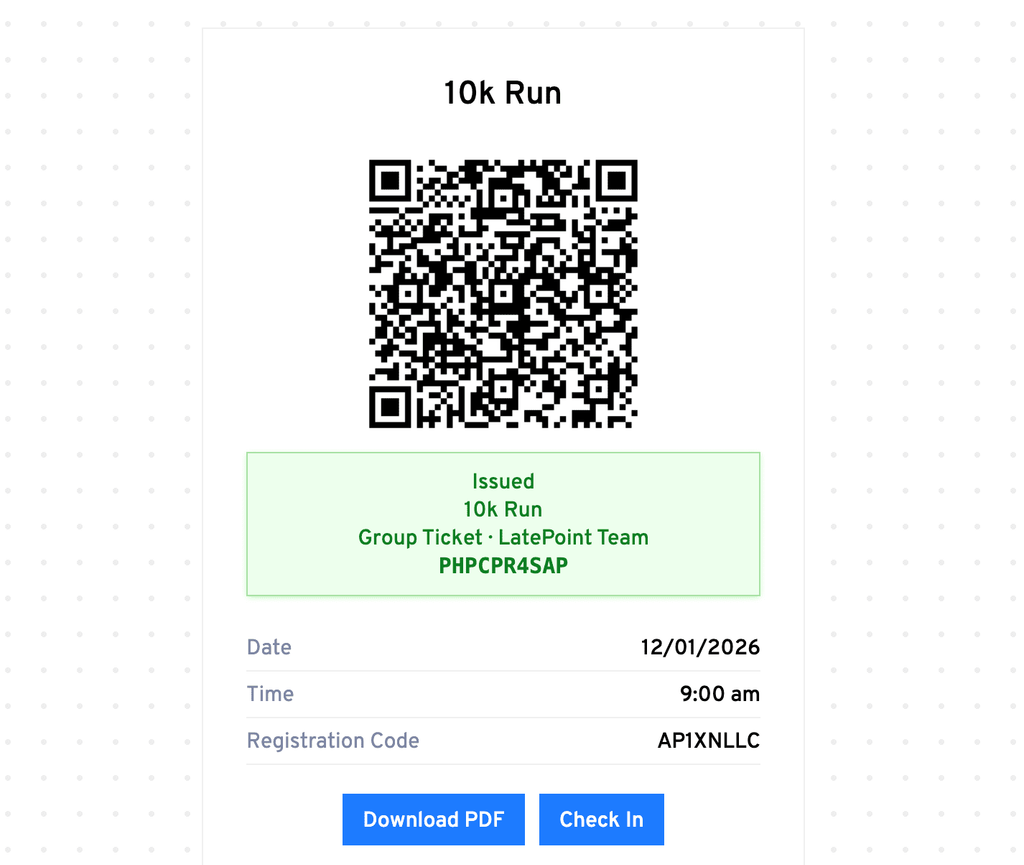
Each block includes the ticket’s QR code, ticket label, ticket code, and a View Ticket link.
For example, if a registration contains 3 individual tickets and a Group Ticket, all 4 ticket QR codes will be included.
Use this variable when you want the confirmation email to contain the customer’s ticket information directly.
Event Ticket URL
{{event_tickets_url}} inserts the URL of the first ticket in the registration.
This is useful when you want to provide a simple link for the customer to view their ticket. For registrations with multiple tickets, use {{event_tickets_qr}} if you want to include all tickets in the notification.
We don't respond to the article feedback, we use it to improve our support content.