
- How to Display Tax-Inclusive Prices in LatePoint
- Bundled Services
- Managing Bookings With The New Shopping Cart
- Set custom start date for the calendar on your booking form
- How to make Phone Number a required field?
- How to Show Only Services or Only Bundles in a Booking Form
- How to Set Base Fee for Group Bookings
- How to Show Custom Display Price for Bundles
- Add booking form directly on a page
- Redirect to a custom “Thank you” page after booking is complete.
- Add custom content before or after booking steps
- Customize Book Button Appearance
- Add preselected Agent, Service or Location on Book Appointment Button or Form
- How to change time slot style on the calendar?
- Custom CSS for changing colors
- Booking Form Editor
- Specify which services, agents and locations will be available on a booking form
- How to pick specific categories to be displayed on the booking form
- How to show only services from specific category
- Set custom fonts for the booking form
- How to setup Facebook Pixel
- How to Disable the Messaging Functionality in LatePoint
- How to upgrade to Version 5?
- How to Update to Version 5.1.0
- Which addons are part of a PRO bundle in version 5?
- How to deactivate my license from a website I no longer use.
- Redirect to a custom “Thank you” page after booking is complete.
- How to add a link to terms of service checkbox custom field
- Edit content of the left panel section
- How to enable self hosted Google Calendar setup?
- How does LatePoint send emails?
- How to enable debug log?
- Add to Calendar link is not working
- Getting “One of the plugins is invalid” error when installing add-ons
- Error: unexpected ‘int’, expecting function…
- Service categories not showing during booking process
- Error: Cannot read properties of null (reading: verifyBuyer)
- WordPress Users still can’t login, even when “Use WordPress users as customers” option is checked
- New service is being created when trying to update existing service.
- Auto-sync of events from Google Calendar is not working
LatePoint Abilities – Connect AI Clients to Your Booking System
LatePoint Abilities allow AI clients such as Claude Desktop, Claude Code, Cursor, Windsurf, and other Model Context Protocol (MCP) compatible applications to securely interact with your LatePoint booking system.
Instead of manually managing bookings from the WordPress dashboard, you can ask your AI assistant to perform tasks such as:
- View appointments
- Search customers
- Create appointments
- Update bookings
- Manage services
- View agents
- Manage locations
- View orders
LatePoint uses the WordPress Abilities API together with the Model Context Protocol (MCP), allowing compatible AI applications to securely communicate with your website.
Requirements
Before you begin, make sure you have:
- WordPress 6.9 or later
- LatePoint version with MCP support
- WordPress MCP Adapter plugin installed and activated
- Administrator access to your WordPress site
- An MCP-compatible AI client, such as:
- Claude Desktop
- Claude Code
- Cursor
- Windsurf
Enabling LatePoint Abilities
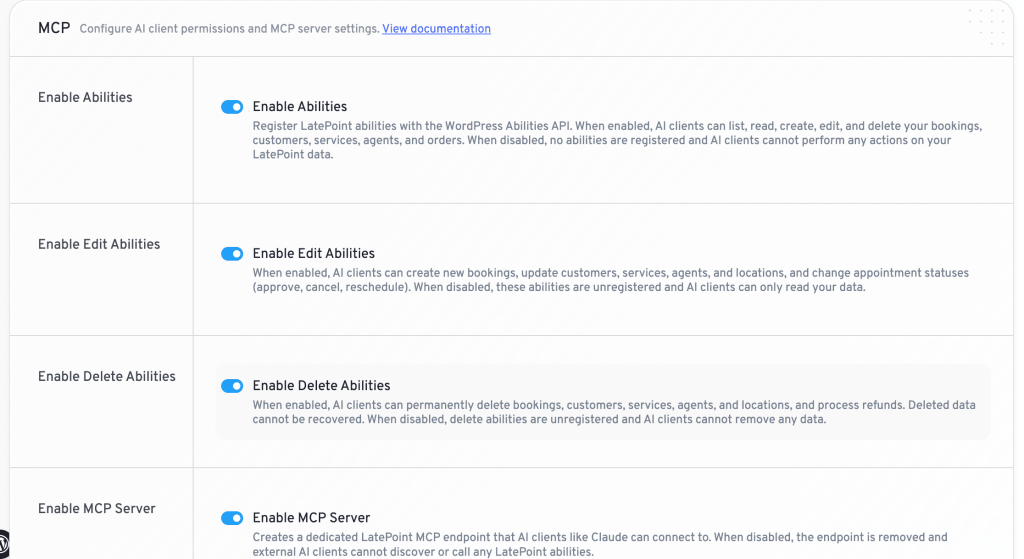
Navigate to: LatePoint > Settings > General > MCP
You’ll see the MCP settings page.
Enable Abilities
Enable the Enable Abilities option.
This registers all available LatePoint abilities with the WordPress Abilities API.
By default, this provides read-only access.
Enable Edit Abilities (Optional)
Enable Edit Abilities if you want AI clients to create and modify data.
This allows AI assistants to:
- Create appointments
- Update appointments
- Create customers
- Update customers
- Manage services
- Manage agents
- Manage orders
If disabled, AI assistants can only read data.
Enable Delete Abilities (Optional)
Enable Delete Abilities if you want AI assistants to permanently delete supported LatePoint records.
Warning Delete operations are permanent and should only be enabled if required.
Enable the MCP Server
Turn on Enable MCP Server.
This publishes the LatePoint MCP endpoint: https://yourwebsite.com/wp-json/latepoint/v1/mcp
Most users won’t need to manually use this endpoint, as LatePoint automatically generates the configuration required for supported AI clients.
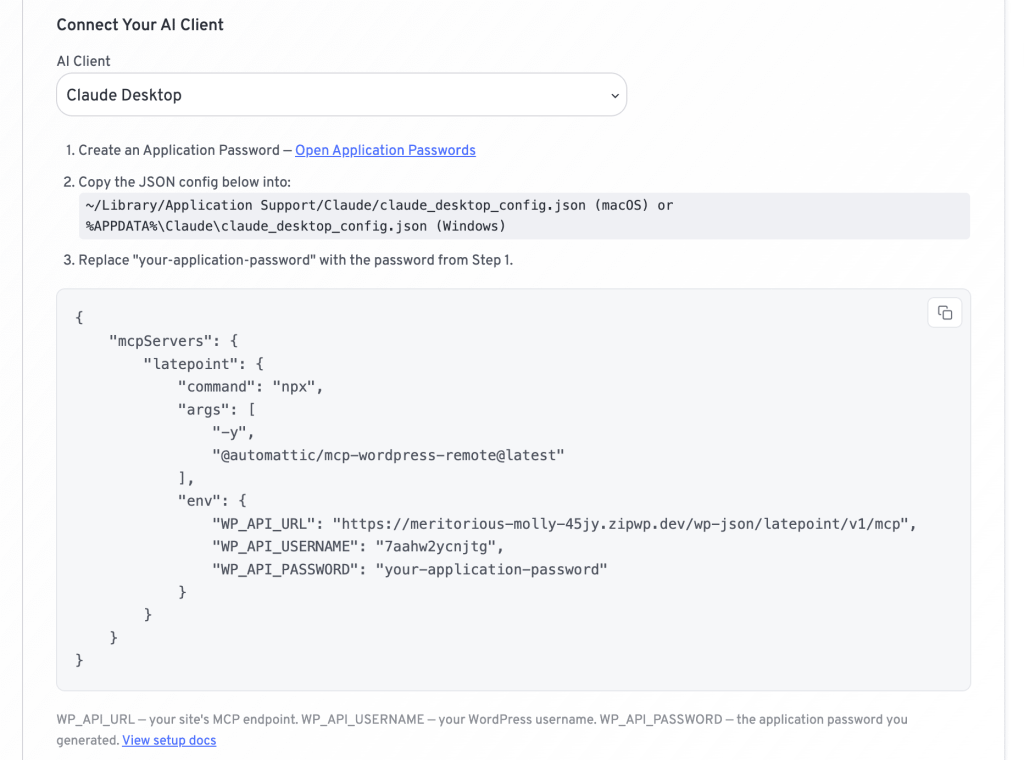
Connect Your AI Client
After enabling the MCP Server, the MCP settings page displays configuration instructions.
- Select your AI client.
- Copy the generated configuration.
- Paste it into your AI client’s MCP configuration.
- Save the configuration.
- Restart your AI client.
Your AI assistant will now be able to access LatePoint according to the permissions you’ve enabled.
Available Permissions
| Setting | Description |
|---|---|
| Enable Abilities | Allows AI clients to read LatePoint data |
| Enable Edit Abilities | Allows AI clients to create and update data |
| Enable Delete Abilities | Allows AI clients to delete supported records |
| Enable MCP Server | Makes the MCP endpoint available to AI clients |
Available Abilities
Depending on your permissions, AI assistants can perform actions such as:
Appointments
- View appointments
- Search appointments
- Create appointments
- Update appointments
- Delete appointments
Customers
- View customers
- Search customers
- Create customers
- Update customers
- Delete customers
Services
- View services
- Create services
- Update services
- Delete services
Agents
- View agents
- Create agents
- Update agents
- Delete agents
Locations
- View locations
- Create locations
- Update locations
- Delete locations
Orders
- View orders
- Update orders
The exact abilities available depend on the permissions you’ve enabled.
Recommended Configurations
Read-Only Access
Enable:
- Enable Abilities
- Enable MCP Server
Recommended if you only want your AI assistant to answer questions about your booking data.
Read & Edit Access
Enable:
- Enable Abilities
- Enable Edit Abilities
- Enable MCP Server
Recommended if you want your AI assistant to manage appointments and customers.
Full Access
Enable:
- Enable Abilities
- Enable Edit Abilities
- Enable Delete Abilities
- Enable MCP Server
Only recommended if you trust your AI assistant with deleting data.
Security
LatePoint gives you complete control over what AI assistants can do.
- Disable Edit Abilities to prevent modifications.
- Disable Delete Abilities to prevent deletions.
- Disable Enable Abilities to completely disable AI access.
- Disable Enable MCP Server to stop all MCP connections.
Example Prompts
Once connected, you can ask your AI assistant questions like:
- Show today’s appointments.
- List tomorrow’s bookings.
- Find customer John Smith.
- Create an appointment for Sarah tomorrow at 3 PM.
- Update John’s phone number.
- List all available services.
- Show all agents.
- What appointments are scheduled this week?
Troubleshooting
MCP settings are not visible
Make sure you’re using:
- WordPress 6.9 or later
- A version of LatePoint that includes MCP support
AI client cannot connect
Verify that:
- The WordPress MCP Adapter plugin is installed and activated.
- The MCP Server is enabled.
- The generated configuration has been copied correctly.
- Your AI client supports MCP.
No abilities are available
Usually this means one of the following:
- Enable Abilities is disabled.
- The MCP Adapter plugin is inactive.
- Your AI client needs to reconnect after changing permissions.
Frequently Asked Questions
Can I make my AI assistant read-only?
Yes. Enable Enable Abilities, but leave Edit Abilities and Delete Abilities disabled.
Can I disable AI access later?
Yes. Simply disable Enable Abilities or Enable MCP Server.
Which AI clients are supported?
Any AI client that supports the Model Context Protocol (MCP).
Can I control what my AI assistant is allowed to do?
Yes. LatePoint lets you independently enable:
- Read access
- Edit access
- Delete access
This allows you to choose the level of access that best suits your workflow.
We don't respond to the article feedback, we use it to improve our support content.