
- How to Display Tax-Inclusive Prices in LatePoint
- Bundled Services
- Managing Bookings With The New Shopping Cart
- Set custom start date for the calendar on your booking form
- How to make Phone Number a required field?
- How to Show Only Services or Only Bundles in a Booking Form
- How to Set Base Fee for Group Bookings
- How to Show Custom Display Price for Bundles
- Add booking form directly on a page
- Redirect to a custom “Thank you” page after booking is complete.
- Add custom content before or after booking steps
- Customize Book Button Appearance
- Add preselected Agent, Service or Location on Book Appointment Button or Form
- How to change time slot style on the calendar?
- Custom CSS for changing colors
- Booking Form Editor
- Specify which services, agents and locations will be available on a booking form
- How to pick specific categories to be displayed on the booking form
- How to show only services from specific category
- Set custom fonts for the booking form
- How to setup Facebook Pixel
- How to Disable the Messaging Functionality in LatePoint
- How to upgrade to Version 5?
- How to Update to Version 5.1.0
- Which addons are part of a PRO bundle in version 5?
- How to deactivate my license from a website I no longer use.
- Redirect to a custom “Thank you” page after booking is complete.
- How to add a link to terms of service checkbox custom field
- Edit content of the left panel section
- How to enable self hosted Google Calendar setup?
- How does LatePoint send emails?
- How to enable debug log?
- Add to Calendar link is not working
- Getting “One of the plugins is invalid” error when installing add-ons
- Error: unexpected ‘int’, expecting function…
- Service categories not showing during booking process
- Error: Cannot read properties of null (reading: verifyBuyer)
- WordPress Users still can’t login, even when “Use WordPress users as customers” option is checked
- New service is being created when trying to update existing service.
- Auto-sync of events from Google Calendar is not working
- Understanding limitations of Google App user type
- Data missing after update or your license key is not working
- I am getting “Invalid Request” error when creating or updating records
- LatePoint can not reach my website when setting up Google Calendar or Stripe Connect
- Prevent Agents being redirected to WooCommerce “My Account” Page when trying to login to LatePoint Agent Account
- When customers try login in to Customer Dashboard they are re-directed to the same login page again
- Google Calendar Connect shows app is not verified message
- Google Authorization Error. Clicking Connect Button on Google Calendar not working
- How to fix Verification Error on the LatePoint Booking Form
- How to Fix the “Error: Email Address Has to Be Unique” While Creating Appointments via Admin UI
- How to Roll Back to a Previous Version of LatePoint
- Load LatePoint Front-End Scripts Only on Specific Pages
- How to Fix “The selected payment method is not available. Please choose a valid payment method and try again.”
- How to Fix “Stripe Connect Account ID Not Set” Error
How to Roll Back to a Previous Version of LatePoint
LatePoint receives regular updates that introduce new features, improvements, and bug fixes. While these updates are thoroughly tested, you may occasionally need to temporarily use an earlier version for troubleshooting or compatibility purposes.
This guide shows you how to download and install a previous version of LatePoint from the WordPress.org plugin repository.
Note: We recommend using the latest version of LatePoint whenever possible to benefit from the newest features, improvements, and security updates.
Downloading a Previous Version of LatePoint
Follow these steps to download a previous version of LatePoint.
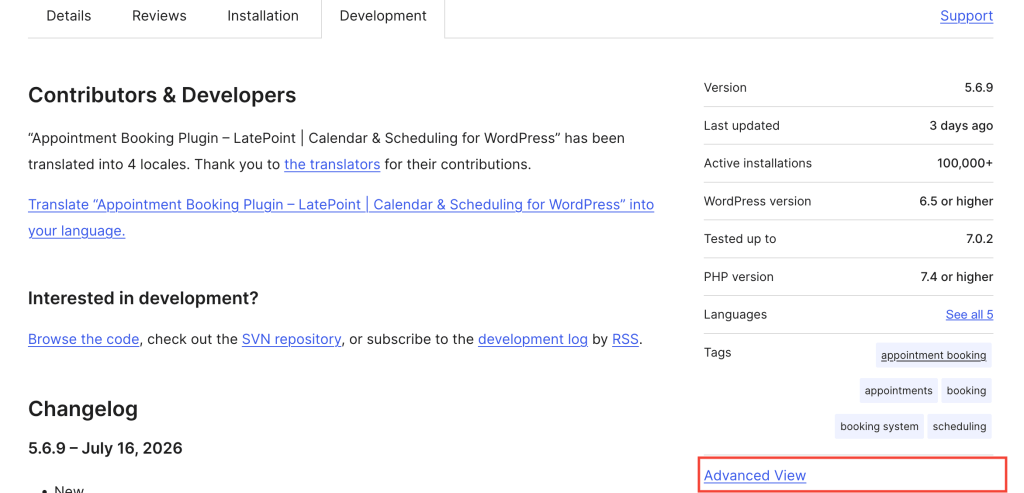
Step 1: Open the Advanced View
Visit the LatePoint plugin page on WordPress.org: https://wordpress.org/plugins/latepoint/
Click on the development tab, scrolldown and click on the advanced view link.
Step 2: Select a Previous Version
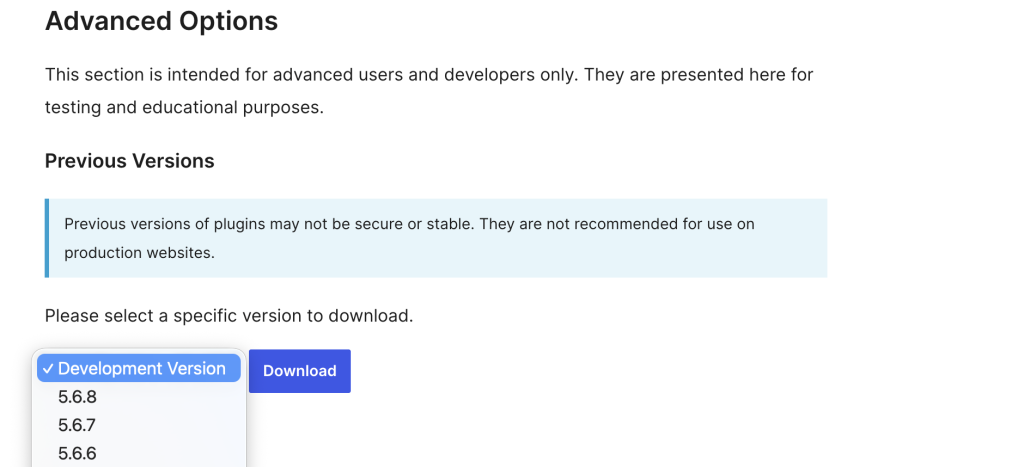
On the Advanced View page, scroll down to the Previous Versions section.
- Click the version dropdown.
- Select the version you want to install.
- Click Download.
This downloads the selected version as a ZIP file.
Step 3: Install the Downloaded Version
After downloading the ZIP file:
- Log in to your WordPress admin dashboard.
- Go to Plugins > Add Plugin.
- Click Upload Plugin.
- Select the ZIP file you downloaded.
- Click Install Now.
If WordPress detects that LatePoint is already installed, you’ll be prompted to replace the current version.
Select Replace current with uploaded to continue.
Once the installation is complete, the selected version of LatePoint will be installed on your website.
Note: If you’re unsure which version to install or continue experiencing issues after rolling back, please contact our support team and we’ll be happy to help.
We don't respond to the article feedback, we use it to improve our support content.